Features:
- Professional curve tester with plastic shell
- Dual-channel signal input
- Two channels simultaneously display 3 frequencies
- 4 adjustable voltages: 0.6V, 4V, 8V and 16V
- Channel A, channel B, channel A+B display
- Adjustable channel B position for easy comparison measurement
Oscilloscope Parameter Settings:
- Adjust your oscilloscope to X-Y mode (different oscilloscopes have different adjustment methods, please explore by yourself)
- The vertical parameters of X/Y 2 channels are adjusted to 1V/div, and a single trace oscilloscope only needs to adjust one.
- Analog oscilloscope does not need to adjust the time base; digital oscilloscope time base is adjusted to 1-5ms
- When connected correctly, the oscilloscope will display a horizontal line. If the vertical line is displayed, the XY plugs need to be reversed.
- The horizontal and vertical lines are in the display frame when adjusting the vertical and horizontal parameters.
Connect Analog Oscilloscope:
The connection of the analog oscilloscope is relatively simple. Different oscilloscopes are slightly different. Adjust an oscilloscope to the X-Y mode. Some oscilloscopes are selected by pressing buttons, and some are selected by the knob to the XY mode. Please research by yourself. Connect your oscilloscope with a BNC cable and then power on, a horizontal line will be displayed under normal conditions. Adjust the XY vertical channel parameters by about 1V/div, and then adjust the XY attenuation so that the horizontal line is in the display frame. The horizontal line length can also be adjusted via the X attenuation potentiometer on the VI tester board. Short-circuit the test leads, a vertical line will be displayed under normal conditions. If the vertical line is too long or too short, you need to adjust the Y channel parameters so that the vertical line is within the display frame, generally half a grid or 1 grid to the edge. When the horizontal and vertical lines are normal, you can enter the normal measurement.
Connect Digital Oscilloscope:
Enter the XY mode of your digital oscilloscope through the menu or keys, and adjust the two channels of X and Y to 1V/div. The single-trace oscilloscope only needs to adjust the Y channel. The adjustment time base is 1-5ms. Select DC coupling for X Y channels with 1X attenuation. When the oscilloscope is not connected, the screen should be a bright spot, adjust the horizontal and vertical so that the bright spot is centered. After the VI tester is connected, there is normally a horizontal line. Adjust the 103 potentiometer at the top of the VI board so that the horizontal line is within the display frame, half a grid or 1 grid to the edge. Short-circuit the test leads, the display should be a vertical line at this time, adjust the Y channel parameters so that the vertical line is in the display box. At this point, the debugging is over.
Test Online Circuit Board:
When testing a circuit board online, the circuit board should not be charged. If there is a large capacitor on the circuit board, discharge the capacitor first, otherwise the VI test board will be burnt out.
Package Included:
- 1 x VI Curve Tester
- 1 x Set of Test Leads
- 1 x BNC Connecting Cable
- 1 x Power Adapter
Logistics information
Our products are located in Hong Kong, China, and the logistics speed depends on your specific location. According to our experience, it usually takes about 15-20 days of transportation time
CONTACT US
If you have questions or concerns then please do not hesitate to get in contact with us.
We would love to hear from you, contact us on:
whatsapp:+8613625959351
RETURNS POLICY
Lorem ipsum dolor sit amet, consectetur adipiscing elit. Morbi ut blandit risus. Donec mollis nec tellus et rutrum. Orci varius natoque penatibus et magnis dis parturient montes, nascetur ridiculus mus. Ut consequat quam a purus faucibus scelerisque. Mauris ac dui ante. Pellentesque congue porttitor tempus. Donec sodales dapibus urna sed dictum. Duis congue posuere libero, a aliquam est porta quis.
Donec ullamcorper magna enim, vitae fermentum turpis elementum quis. Interdum et malesuada fames ac ante ipsum primis in faucibus.
Curabitur vel sem mi. Proin in lobortis ipsum. Aliquam rutrum tempor ex ac rutrum. Maecenas nunc nulla, placerat at eleifend in, viverra etos sem. Nam sagittis lacus metus, dignissim blandit magna euismod eget. Suspendisse a nisl lacus. Phasellus eget augue tincidunt, sollicitudin lectus sed, convallis desto. Pellentesque vitae dui lacinia, venenatis erat sit amet, fringilla felis. Nullam maximus nisi nec mi facilisis.
SHIPPING
Lorem ipsum dolor sit amet, consectetur adipiscing elit. Morbi ut blandit risus. Donec mollis nec tellus et rutrum. Orci varius natoque penatibus et magnis dis parturient montes, nascetur ridiculus mus. Ut consequat quam a purus faucibus scelerisque. Mauris ac dui ante. Pellentesque congue porttitor tempus. Donec sodales dapibus urna sed dictum. Duis congue posuere libero, a aliquam est porta quis.
Donec ullamcorper magna enim, vitae fermentum turpis elementum quis. Interdum et malesuada fames ac ante ipsum primis in faucibus.
Curabitur vel sem mi. Proin in lobortis ipsum. Aliquam rutrum tempor ex ac rutrum. Maecenas nunc nulla, placerat at eleifend in, viverra etos sem. Nam sagittis lacus metus, dignissim blandit magna euismod eget. Suspendisse a nisl lacus. Phasellus eget augue tincidunt, sollicitudin lectus sed, convallis desto. Pellentesque vitae dui lacinia, venenatis erat sit amet, fringilla felis. Nullam maximus nisi nec mi facilisis.
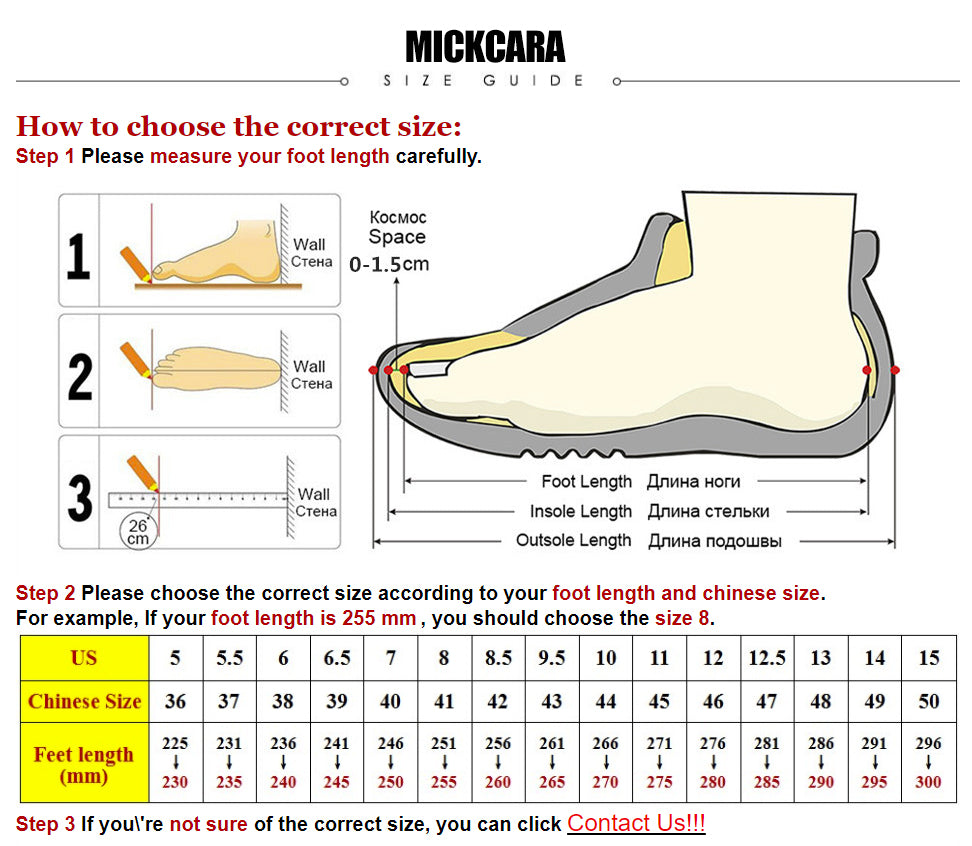
How to choose the correct size:
Step 1 Please measure your foot length carefully.
Step 2 Please choose the correct size according to your foot length and chinese size.
For example, If your foot length is 255 mm , you should choose the size 8.
Step 3 If you\'re not sure of the correct size, you can click chat with us!
WHATSAPP:+8613625959351


