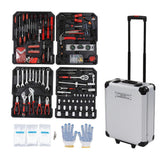
Features:1. Designed to effortlessly remove press-fit parts including ball joints, U-joints, brake anchor pins, and more on most 2-wheel drive (2WD) and 4-wheel drive (4WD) vehicles without removing the control arm from the vehicle.2. Forged C-frame press alone can be used to remove and replace universal joints.3. The blow molded case keeps tools securely organized for conveniently transport.4. Servicing most American domestic and imported 2WD/4WD car and light pickup trucks that have press-fit type ball joints, include 4-wheel drive (4WD) adapter that allows service for 1967 thru current 1/2 and 3/4 ton 4WD vehicles having the Dana 30 or 44 front axle (Fit for Ford, GM, Dodge, IHC and Jeep vehicles).5. It is a tool set for Car Light Truck repairing.Remove&Install Brake Anchor PinsTo remove the brake anchor pins, remove all lock ring retainers from the Brake Anchor Pins. Position the Ball Joint Press over the brake spider.Tighten the Jackscrew until the anchor pins can be removed.To install the brake anchor pins, insert the brake anchor pins. Then reinstall the lock ring retainers on the brake anchor pin.Unscrew and remove the Ball Joint Press.Assemble&Disassemble a U-jointTo disassemble a "U" joint, remove any external and/or internal lock rings. Position the Ball Joint Press around the drive shaft yoke and tighten the Jackscrew until the first bearing is removed.Reposition the Ball Joint Press and remove the second bearing. To assemble a "U" joint, clean all dirt and oil from the yoke area.Align the replacement bearing and Ball Joint Press as straight as possible over the yoke. Press the replacement bearing into the yoke, and reassemble the external/internal lock ring.Reposition the Ball Joint Press and second replacement bearing as straight as possible over the yoke, and press the bearing into the yoke. Reassemble the external/internal lock ring.Remove a Ball JointAssemble the Ball Joint Press over the vehicle's control arm. Select the correct size Receiving Tube, and position it under the vehicle's ball joint.Place the Removal Adapter between the Receiving Tube and the Jackscrew.Then, place the Installation Adapter between the top of the ball joint and the Ball Joint Press.Tighten the Jackscrew until the Receiving Tube contacts the vehicle's control arm.Check the alignment of all the Ball Joint Kit parts, and continue tightening the Jackscrew until the vehicle's ball joint is removed.Install a Ball JointClean the vehicle's control arm, and coat the inside diameter of the control arm with a light lubricant.Insert the replacement ball joint as straight as possible into the vehicle's control arm.Assemble the Ball Joint Press over the vehicle's control arm. Select the correct size Receiving Tube and position it on top of the vehicle's control arm.Place the Installation Adapter between the Receiving Tube and the Ball Joint Press. Then, place the Removal Adapter between the ball joint and the Jackscrew.Check the alignment of all the Ball Joint Kit parts. Then, tighten the Jackscrew until the vehicle's ball joint is firmly sealed.Specification:Condition: 100% Brand NewItem Type: Ball Joint Service AdapterQuantity: 21pcsPackage List:1 x Red Plastic Box16 x Iron Sleeve Adapter1 x U Clip2 x Discus Adapter1 x Screw1 x Iron Rod Adapter1 x Manual .
Logistics information
Our products are located in Hong Kong, China, and the logistics speed depends on your specific location. According to our experience, it usually takes about 15-20 days of transportation time
CONTACT US
If you have questions or concerns then please do not hesitate to get in contact with us.
We would love to hear from you, contact us on:
whatsapp:+8613625959351
RETURNS POLICY
Lorem ipsum dolor sit amet, consectetur adipiscing elit. Morbi ut blandit risus. Donec mollis nec tellus et rutrum. Orci varius natoque penatibus et magnis dis parturient montes, nascetur ridiculus mus. Ut consequat quam a purus faucibus scelerisque. Mauris ac dui ante. Pellentesque congue porttitor tempus. Donec sodales dapibus urna sed dictum. Duis congue posuere libero, a aliquam est porta quis.
Donec ullamcorper magna enim, vitae fermentum turpis elementum quis. Interdum et malesuada fames ac ante ipsum primis in faucibus.
Curabitur vel sem mi. Proin in lobortis ipsum. Aliquam rutrum tempor ex ac rutrum. Maecenas nunc nulla, placerat at eleifend in, viverra etos sem. Nam sagittis lacus metus, dignissim blandit magna euismod eget. Suspendisse a nisl lacus. Phasellus eget augue tincidunt, sollicitudin lectus sed, convallis desto. Pellentesque vitae dui lacinia, venenatis erat sit amet, fringilla felis. Nullam maximus nisi nec mi facilisis.
SHIPPING
Lorem ipsum dolor sit amet, consectetur adipiscing elit. Morbi ut blandit risus. Donec mollis nec tellus et rutrum. Orci varius natoque penatibus et magnis dis parturient montes, nascetur ridiculus mus. Ut consequat quam a purus faucibus scelerisque. Mauris ac dui ante. Pellentesque congue porttitor tempus. Donec sodales dapibus urna sed dictum. Duis congue posuere libero, a aliquam est porta quis.
Donec ullamcorper magna enim, vitae fermentum turpis elementum quis. Interdum et malesuada fames ac ante ipsum primis in faucibus.
Curabitur vel sem mi. Proin in lobortis ipsum. Aliquam rutrum tempor ex ac rutrum. Maecenas nunc nulla, placerat at eleifend in, viverra etos sem. Nam sagittis lacus metus, dignissim blandit magna euismod eget. Suspendisse a nisl lacus. Phasellus eget augue tincidunt, sollicitudin lectus sed, convallis desto. Pellentesque vitae dui lacinia, venenatis erat sit amet, fringilla felis. Nullam maximus nisi nec mi facilisis.
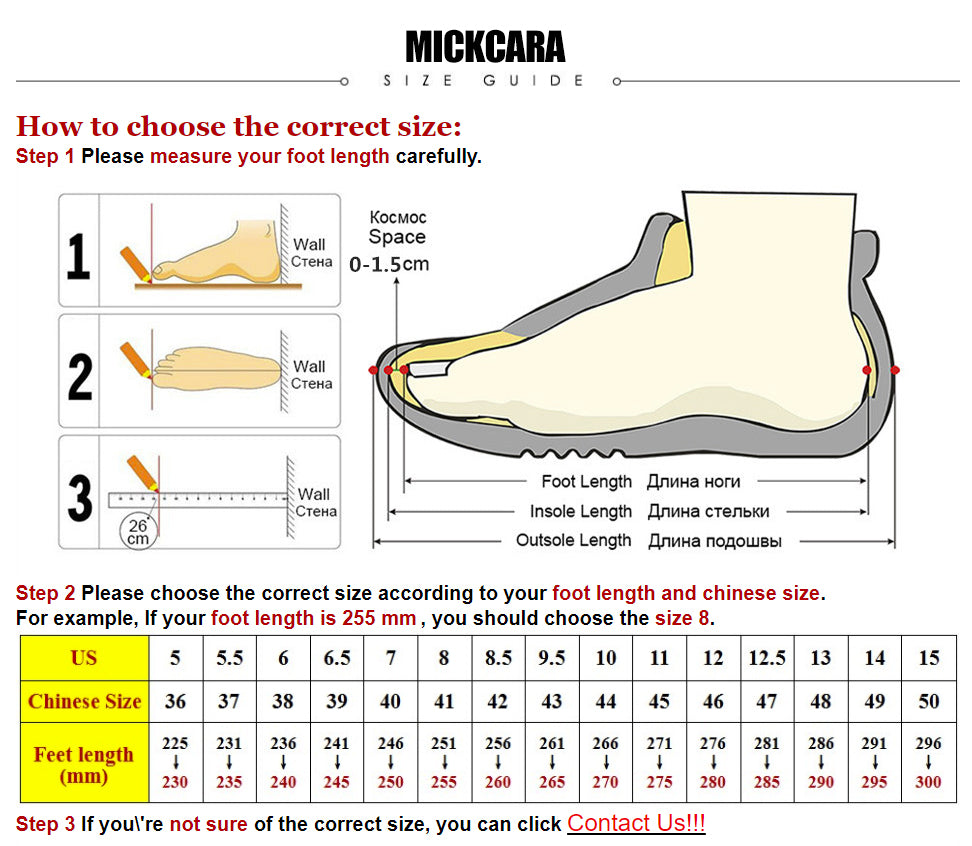
How to choose the correct size:
Step 1 Please measure your foot length carefully.
Step 2 Please choose the correct size according to your foot length and chinese size.
For example, If your foot length is 255 mm , you should choose the size 8.
Step 3 If you\'re not sure of the correct size, you can click chat with us!
WHATSAPP:+8613625959351