Specifications:
Dimensions: 70x49x22mm (2.76x1.93x0.87in)
Color: Grey
Model: PH8586U
HDD Interface: Supports M Key, B&M Key
Input Interface: USB3.2 Type-C Gen2X2 (20Gbps)
Compatibility: For Windows, for Mac, for Linux (With UASP function)
Protocol: Supports M.2 & M.3 NVME PCI-E
Main Control Chip: JMS586U
Transmission Speed: Up to 20Gbps
Material: Aluminum Alloy Shell
Supported SSDs: 2x NGFF M.2 M-Key NVME SSDs, P1 AHCI SSDs, for Mac 2013-2015 12+16Pin SSDs, for Macbook Air Retina, for Mac Pro, for iMac
Interface: Type-C
Data Transfer: GEN2x2 (20Gb/s)
Power Supply: PD Protocol 5V-20V, QC Protocol 5V-12V
Cloning: Supports NVME to NVME SSD offline cloning, supports AHCI to NVME SSD offline cloning
Indicator light description:
PER: White power indicator. Turns on when power is switched on; turns off when power is switched off.
USB: Emerald green + red. Type-C USB GEN2x2 data link is normal when the emerald green indicator light is on; USB data is not connected when the red indicator light is on.
P1: Emerald green SSD status indicator for the P1 position. Lights up when the SSD link in the P1 position is normal.
P2: Emerald green SSD status indicator for the P2 position. Lights up when the SSD link in the P2 position is normal.
25%, 50%, 75%, 100%: Blue indicators. Represent the mode and cloning progress.
Offline cloning instructions for use:
1. The P1 position accesses the original data disk, supporting NVMe protocol and AHCI protocol SSDs (Note: For the P1 position using MAC12 + 16Pin AHCI protocol SSD, an adapter card is required to convert the SSD to NGFF M.2 M-Key gold finger).
2. The P2 position accesses the cloning target disk, supporting NVMe protocol SSDs with a capacity equal to or greater than the source data disk.
3. Connect the Type-C power adapter and lightly press the power switch to turn on the power. The PWR white power indicator light will illuminate; there is no need to connect the Type-C USB GEN2x2 cable.
4. Wait for a few seconds until the green LEDs on P1 and P2 light up, indicating that the master has recognized the P1 source data disk and the P2 clone target disk.
5. Long-press the "START" button for 5 seconds. When 25% to 100% of the four blue lights flash continuously, it indicates entry into cloning mode. Press the "START" button again; when the data copy progress reaches 25%, the 25% to 100% of the four blue lights will start moving back and forth. When the data copying progress reaches 25%, the 25% blue indicator light will remain lit, while the 50%-100% lights continue to move back and forth. Know that when 100% is lit constantly, it means the cloning is completed.
Package Included:
1 x SSD Clone Base
Logistics information
Our products are located in Hong Kong, China, and the logistics speed depends on your specific location. According to our experience, it usually takes about 15-20 days of transportation time
CONTACT US
RETURNS POLICY
Lorem ipsum dolor sit amet, consectetur adipiscing elit. Morbi ut blandit risus. Donec mollis nec tellus et rutrum. Orci varius natoque penatibus et magnis dis parturient montes, nascetur ridiculus mus. Ut consequat quam a purus faucibus scelerisque. Mauris ac dui ante. Pellentesque congue porttitor tempus. Donec sodales dapibus urna sed dictum. Duis congue posuere libero, a aliquam est porta quis.
Donec ullamcorper magna enim, vitae fermentum turpis elementum quis. Interdum et malesuada fames ac ante ipsum primis in faucibus.
Curabitur vel sem mi. Proin in lobortis ipsum. Aliquam rutrum tempor ex ac rutrum. Maecenas nunc nulla, placerat at eleifend in, viverra etos sem. Nam sagittis lacus metus, dignissim blandit magna euismod eget. Suspendisse a nisl lacus. Phasellus eget augue tincidunt, sollicitudin lectus sed, convallis desto. Pellentesque vitae dui lacinia, venenatis erat sit amet, fringilla felis. Nullam maximus nisi nec mi facilisis.
SHIPPING
Lorem ipsum dolor sit amet, consectetur adipiscing elit. Morbi ut blandit risus. Donec mollis nec tellus et rutrum. Orci varius natoque penatibus et magnis dis parturient montes, nascetur ridiculus mus. Ut consequat quam a purus faucibus scelerisque. Mauris ac dui ante. Pellentesque congue porttitor tempus. Donec sodales dapibus urna sed dictum. Duis congue posuere libero, a aliquam est porta quis.
Donec ullamcorper magna enim, vitae fermentum turpis elementum quis. Interdum et malesuada fames ac ante ipsum primis in faucibus.
Curabitur vel sem mi. Proin in lobortis ipsum. Aliquam rutrum tempor ex ac rutrum. Maecenas nunc nulla, placerat at eleifend in, viverra etos sem. Nam sagittis lacus metus, dignissim blandit magna euismod eget. Suspendisse a nisl lacus. Phasellus eget augue tincidunt, sollicitudin lectus sed, convallis desto. Pellentesque vitae dui lacinia, venenatis erat sit amet, fringilla felis. Nullam maximus nisi nec mi facilisis.

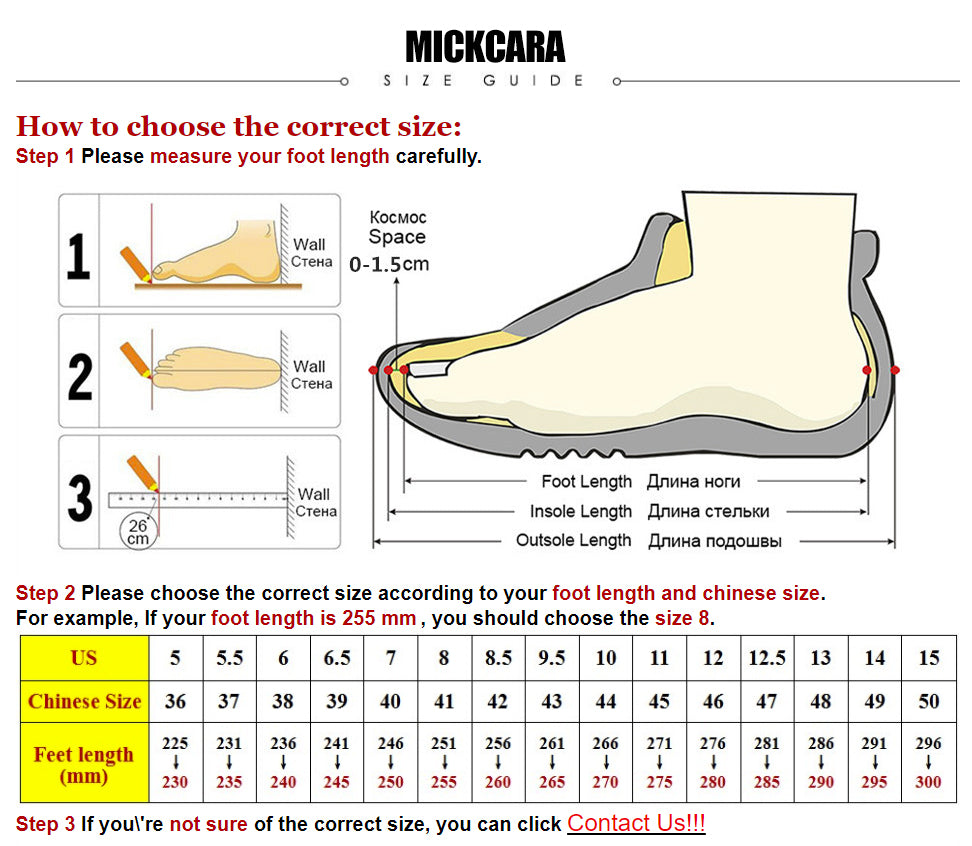
How to choose the correct size:
Step 1 Please measure your foot length carefully.

Step 2 Please choose the correct size according to your foot length and chinese size.
For example, If your foot length is 255 mm , you should choose the size 8.