AG-TD Series
Freeboss AG-TD Series USB Play and Record Bluetooth 99 DSP Effects 7 Band EQ Audio Mixer
Click to go to AG-TD6 listing:
Difference
AG-TD4 : 4 Channels -- 2 Mono +1 Stereo
AG-TD6 : 6 Channels -- 4 Mono +1 Stereo
Click to go to XLR cable listing:
1. 4/6 Channels
2. 24 BIT 40KHz 99 DSP Effect
3. 7 Band EQ
4. Bluetooth
5. USB Play and Record
6. Built-in EQ for USB Play
99 DSP Effects
How to choose effect?
1). Choose:
Rotate the "Program" knob to choose the effect
2). Confirm:
Press the "Program" knob to confirm the effect
How to adjust the effect
1). Rotate the "EFF SEND" knob to transmit the effect to Channels.
2). Rotate the "EFF/AUX" knob to receive the effect.
3). Rotate the "EFF VOL" to transmite the effect to Main out.
7 Band EQ
USB Menu
when there is no USB stick
1. Press 1st button, enter the menu
(or long press 4th button to enter the menu.)
2. Press 2nd and 3rd to choose the Menu
3. Press the 4th button to confirm the menu and come into the next level menu.
Bluetooth Function
1. Come into Bluetooth Menu,
2. Press the 4th button to enter the status of "waiting for Pairing"
3. Turn on your bluetooth equipment, such as mobile, Search and pair the bluetooth.
USB Play
1. Music format:FLAC, MP3, WAV, WMA
2. Operation instruction:
1) Insert USB stick
2) Press "USB or 3/4" button to choose "USB"
3) Adjust channel volume
4) Adjust Main out volume.
3. USB volume adjust:
Long press the 2nd button to reduce the volume.
Long press the 3rd button to increase the volume.
4. USB play order
Operation instruction:
a) Press 1st button to enter the Menu.
b) Press 2nd or 3rd button to choose the "Music"
c) Press the 4th button to enter the Next level
d) Press 2nd or 3rd button to choose the "Repeat"
e) Press the 4th button to enter the NEXT level
f) Press 2nd or 3rd button to choose the EQ you like.
g) Press the 4th button to confirm.
5. Built-in EQ for USB play
1) This funciton is only for USB play.
2) Operation instruction:
a) Press 1st button to enter the Menu.
b) Press 2nd or 3rd button to choose the "Music"
c) Press the 4th button to enter the Next level
d) Press 2nd or 3rd button to choose the "Equalizer"
e) Press the 4th button to enter the NEXT level
f) Press 2nd or 3rd button to choose the EQ you like.
g) Press the 4th button to confirm.
USB Record and play
1) Insert USB stick ( in the Stick, there must be at least one song)
2) Long Press 1st button to enter the status of Record
3) Press the 4th button to begin the record
4) Press the 4th button to pause the record
5) Long press the 1st button to End the record and begin to play the record.
+48V Phantom Power
1. For this model, there is only one +48V phanotm power switch.
2. When you turn on the +48V phantom power, all XLR input sockets will supply the +48V phantom power.
Dynamic microphone :
Do not open phantom power,otherwise, the microphone may be burned.
(please use XLR plug,not a 6.3 plug,because use the 6.3 plug,the sound will be too small.)
Condenser Microphone
1.Please sure if your condenser microphone support +48V phantom power.
(Note: Some condenser microphone do not support +48V phantom power, they are only for computer).
2. Power on +48V phantom power to supply the power to conderser microphone.
1 X Mixer
1 X Power Cable
1 X User Manual (English)
Logistics information
Our products are located in Hong Kong, China, and the logistics speed depends on your specific location. According to our experience, it usually takes about 15-20 days of transportation time
CONTACT US
RETURNS POLICY
Lorem ipsum dolor sit amet, consectetur adipiscing elit. Morbi ut blandit risus. Donec mollis nec tellus et rutrum. Orci varius natoque penatibus et magnis dis parturient montes, nascetur ridiculus mus. Ut consequat quam a purus faucibus scelerisque. Mauris ac dui ante. Pellentesque congue porttitor tempus. Donec sodales dapibus urna sed dictum. Duis congue posuere libero, a aliquam est porta quis.
Donec ullamcorper magna enim, vitae fermentum turpis elementum quis. Interdum et malesuada fames ac ante ipsum primis in faucibus.
Curabitur vel sem mi. Proin in lobortis ipsum. Aliquam rutrum tempor ex ac rutrum. Maecenas nunc nulla, placerat at eleifend in, viverra etos sem. Nam sagittis lacus metus, dignissim blandit magna euismod eget. Suspendisse a nisl lacus. Phasellus eget augue tincidunt, sollicitudin lectus sed, convallis desto. Pellentesque vitae dui lacinia, venenatis erat sit amet, fringilla felis. Nullam maximus nisi nec mi facilisis.
SHIPPING
Lorem ipsum dolor sit amet, consectetur adipiscing elit. Morbi ut blandit risus. Donec mollis nec tellus et rutrum. Orci varius natoque penatibus et magnis dis parturient montes, nascetur ridiculus mus. Ut consequat quam a purus faucibus scelerisque. Mauris ac dui ante. Pellentesque congue porttitor tempus. Donec sodales dapibus urna sed dictum. Duis congue posuere libero, a aliquam est porta quis.
Donec ullamcorper magna enim, vitae fermentum turpis elementum quis. Interdum et malesuada fames ac ante ipsum primis in faucibus.
Curabitur vel sem mi. Proin in lobortis ipsum. Aliquam rutrum tempor ex ac rutrum. Maecenas nunc nulla, placerat at eleifend in, viverra etos sem. Nam sagittis lacus metus, dignissim blandit magna euismod eget. Suspendisse a nisl lacus. Phasellus eget augue tincidunt, sollicitudin lectus sed, convallis desto. Pellentesque vitae dui lacinia, venenatis erat sit amet, fringilla felis. Nullam maximus nisi nec mi facilisis.

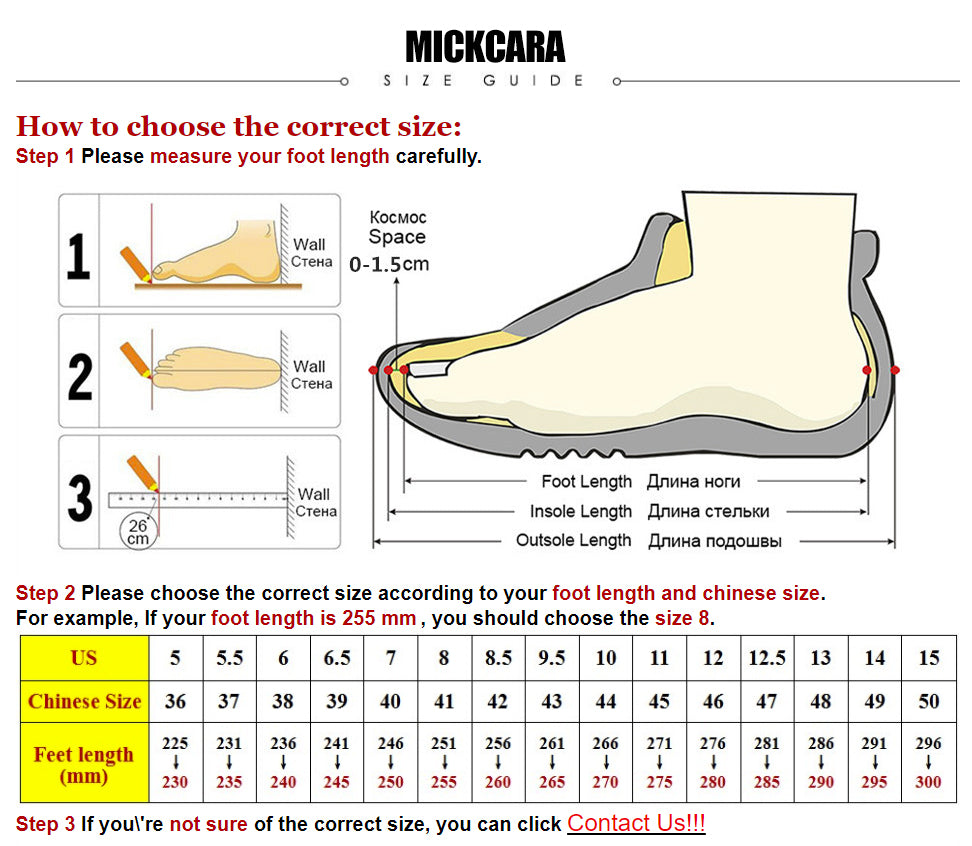
How to choose the correct size:
Step 1 Please measure your foot length carefully.

Step 2 Please choose the correct size according to your foot length and chinese size.
For example, If your foot length is 255 mm , you should choose the size 8.