This product is a professional radio for drone racer. Achieved high precision control and the best product for FPV flying. It provides not only the best control experience but also upgrade in a safety way. We strongly advice to take out the propellers before any upgrade or fine tuning. Make sure DO NOT fly in any crowds /breakable/flammable area.
Specification:(Transmitter)
Brand: Hobbyporter
Model: WT8
Frequency:2.4Ghz
Frequency Hopping: Latest FHSS(64 points,3.6ms)
Channels: 6 channels
Resolution: 4096
Transmission:less than 100mw (20dbm)
Distance: >1000m (depends on actual situation)
Working Voltage:4.2-6v(AAA1.5v*4)
Working current: 100-150mA
Size:162*110*62MM
Color: Graffiti/Flame/Camouflage Color
Application:Helicopter,fixed wing, multi rotor,robot,car,boat
Specification:(Receiver)
Model: WT8S
Frequency: 2.4Ghz
Frequency Hopping: latest FHSS(64 points, 3.6ms)
Channels: 8 channels
Resolution: 4096
Working voltage:3.8-6v
Working current: 70mA
Protocol: compatible with Sbus,ppm
Size:17*11*2mm
Weight:1.2g
Application:helicopter,fixed wing,multi rotor,robot,car
ATTENTION:
If warning alert signal happens on the radio and the plane! Please check your system carefully before taking off. Please make sure the initial interface is showed to avoid any change in setting accidentally.Turn off the receiver power first then radio power off.To avoid failsafe to hurt anybody.
Nor/Rev set up:
Remarks: every channel Nor/Rev will be sound and LED indicated
Set up Steps:
-Turn On: short press the power switch and keep lowest stick
-Enter set up mode:long press Ch5/6 button simultaneously for 10s
-Throttle reverse set up:keep the throttle stick at center and lower the stick to reverse the throttle once
-Aileron, Elevator,Rudder. Move the stick to desired reverse channel
-Nor/Rev Ch5/6. Long press the desire reverse channel for 1s
-Cancel Nor/Rev set up, Long press the Ch5/6 for 3s
Communication Protocol:
-Sbus/ppm selectable: Led flash rapidly when bind switch is pressed, LED keep solid light on when binding succeed within 30s is Sbus. If Led flash slowly when binding succeed within 30s is ppm
-Receiver signal indication: Normal Sbus signal Led keep solid light on, Normal ppm signal Led flash once every 10s, Led off when no signal is detected.
Set up steps:
-Turn on the radio and press binding switch, enter pairing mode when Led flash rapidly
-Turn on the radio, Long press the binding switch by 3s until Blue Led flash slowly to hear a sound "Beep"then release the button. Blue Led flash rapidly to enter the pairing mode
-Binding succeeded when the Led flash from rapidly to solid light on. Reboot the receiver. Press binding switch to complete the pairing
Receiver Antenna:
-Keep antenna upright or it will lower the range of reception
-Keep both antenna in 90 degree
-Carbon fibre and metal components of the model will harmful to the reception of the receiver.Under this circumstances, the best antenna position should be keeping away from them and put correct angle of the antenna to obtain better reception
-Negative: Negative to ground
-Positive: Connect to 5v power
-S signal: Sbus/ppm output signal
Logistics information
Our products are located in Hong Kong, China, and the logistics speed depends on your specific location. According to our experience, it usually takes about 15-20 days of transportation time
CONTACT US
RETURNS POLICY
Lorem ipsum dolor sit amet, consectetur adipiscing elit. Morbi ut blandit risus. Donec mollis nec tellus et rutrum. Orci varius natoque penatibus et magnis dis parturient montes, nascetur ridiculus mus. Ut consequat quam a purus faucibus scelerisque. Mauris ac dui ante. Pellentesque congue porttitor tempus. Donec sodales dapibus urna sed dictum. Duis congue posuere libero, a aliquam est porta quis.
Donec ullamcorper magna enim, vitae fermentum turpis elementum quis. Interdum et malesuada fames ac ante ipsum primis in faucibus.
Curabitur vel sem mi. Proin in lobortis ipsum. Aliquam rutrum tempor ex ac rutrum. Maecenas nunc nulla, placerat at eleifend in, viverra etos sem. Nam sagittis lacus metus, dignissim blandit magna euismod eget. Suspendisse a nisl lacus. Phasellus eget augue tincidunt, sollicitudin lectus sed, convallis desto. Pellentesque vitae dui lacinia, venenatis erat sit amet, fringilla felis. Nullam maximus nisi nec mi facilisis.
SHIPPING
Lorem ipsum dolor sit amet, consectetur adipiscing elit. Morbi ut blandit risus. Donec mollis nec tellus et rutrum. Orci varius natoque penatibus et magnis dis parturient montes, nascetur ridiculus mus. Ut consequat quam a purus faucibus scelerisque. Mauris ac dui ante. Pellentesque congue porttitor tempus. Donec sodales dapibus urna sed dictum. Duis congue posuere libero, a aliquam est porta quis.
Donec ullamcorper magna enim, vitae fermentum turpis elementum quis. Interdum et malesuada fames ac ante ipsum primis in faucibus.
Curabitur vel sem mi. Proin in lobortis ipsum. Aliquam rutrum tempor ex ac rutrum. Maecenas nunc nulla, placerat at eleifend in, viverra etos sem. Nam sagittis lacus metus, dignissim blandit magna euismod eget. Suspendisse a nisl lacus. Phasellus eget augue tincidunt, sollicitudin lectus sed, convallis desto. Pellentesque vitae dui lacinia, venenatis erat sit amet, fringilla felis. Nullam maximus nisi nec mi facilisis.

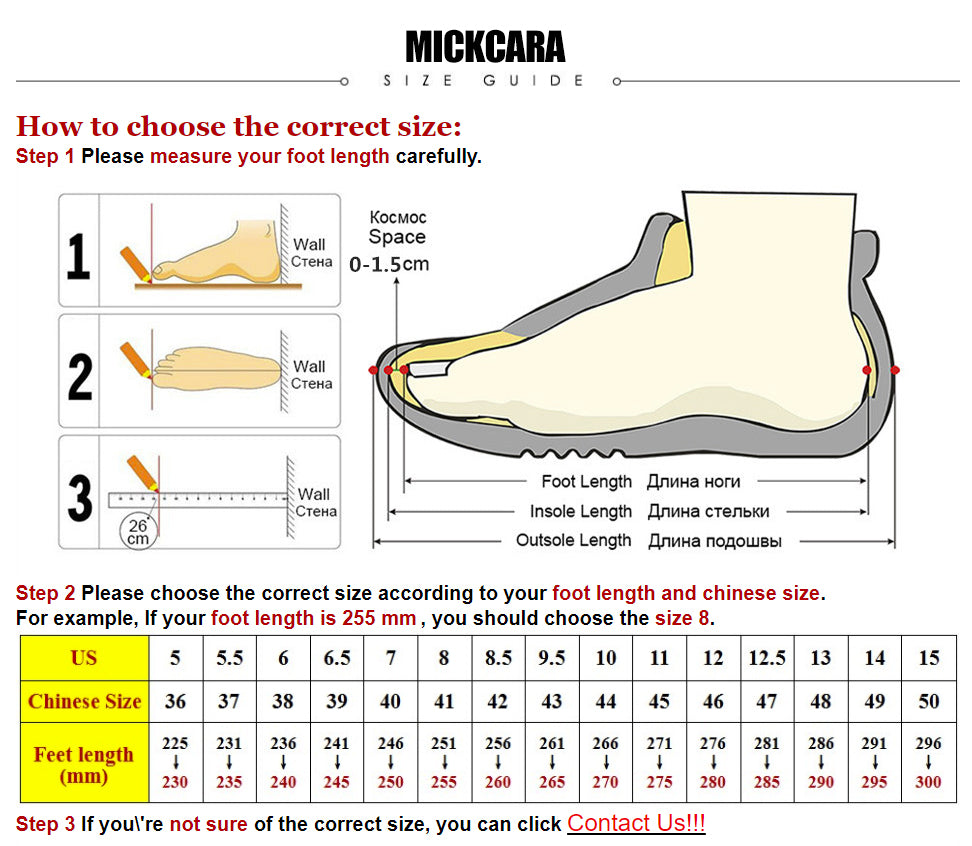
How to choose the correct size:
Step 1 Please measure your foot length carefully.

Step 2 Please choose the correct size according to your foot length and chinese size.
For example, If your foot length is 255 mm , you should choose the size 8.