Product Description
1. Instrument function description
1.1 As shown in the figure:
1.2 Functions of each function key
1.2.1 Press the on key to switch the machine on and off.
After power on, directly enter the waiting measurement interface "Enter To MEA".
1.2.2 In the power-on state, press the menu key to enter the menu mode.
The menu options are zero adjustment, temperature unit selection, automatic shutdown time setting, and backlight on/off setting.
Press the switch key to switch options, and press the enter key to enter the menu option.
After entering the corresponding menu option, press the switch key to switch the options, and press the enter key to confirm the option.
Now return to the main menu interface.
Press the menu key again to exit the menu interface and return to the measurement waiting interface.
Detailed Images
2. Technical parameters
Model
HM-TD1
HM-TD2
HM-TD3
HM-TD4
HM-TD5
HM-TD6
HM-TD7
Measuring range
Brix: 0.0~32.0%
Temperature 10~100℃
Brix: 0.0~53.0%
Temperature 10~100℃
Brix: 0.0~32.0%
Temperature 10~100℃
Brix: 0.0~28.0%
Temperature 10~100℃
Brix: 0.0~53.0%
Temperature 10~100℃
Brix: 0.0~32.0%
Temperature 10~100℃
Brix: 0.0~53.0%
Temperature 10~100℃
Resolution
Brix: 0.1%
Temperature 0.1℃
Brix: 0.1%
Temperature 0.1℃
Brix: 0.1%
Temperature 0.1℃
Brix: 0.1%
Temperature 0.1℃
Brix: 0.1%
Temperature 0.1℃
Brix: 0.1%
Temperature 0.1℃
Brix: 0.1%
Temperature 0.1℃
Accuracy
Brix±0.1%
Temperature ±1℃
Brix±0.1%
Temperature ±1℃
Brix±0.5%
Temperature ±1℃
Brix±0.1%
Temperature ±1℃
Brix±0.5%
Temperature ±1℃
Brix±0.2%
Temperature ±1℃
Brix±0.2%
Temperature ±1℃
Ambient temperature
10~40℃
10~40℃
10~40℃
10~40℃
10~40℃
10~40℃
10~40℃
Sample size
0.3mL
0.3mL
0.3mL
0.3mL
0.3mL
0.3mL
0.3mL
Measure time
3 seconds
3 seconds
3 seconds
3 seconds
3 seconds
3 seconds
3 seconds
Power supply
2*AAA battery 1.5V
2*AAA battery 1.5V
2*AAA battery 1.5V
2*AAA battery 1.5V
2*AAA battery 1.5V
2*AAA battery 1.5V
2*AAA battery 1.5V
Size
130*55*25mm
130*55*25mm
130*55*25mm
130*55*25mm
130*55*25mm
130*55*25mm
130*55*25mm
Weight
100g
100g
100g
100g
100g
100g
100g
3. Test samples
3.1 Power on, directly enter the "Enter To MEA" waiting measurement interface.
3.2 Clean the prism surface with clean water;
3.3 Drop about 0.3ml of the tested sample into the measuring cell (about 2/3 of the depth of the sampling cell).
3.4 Press the "Measuring" key to perform measurement and display the measured value.
3.5 To measure another new sample, clean the measuring cell first and repeat steps 2.2-2.4.
3.6 After use, drip some water into the measuring cell and wipe dry with soft paper or cloth.
Reminder: Don't use a metal spoon when adding samples to the measuring cell to avoid scratching the prism surface.
If the temperature of the sample is different from the temperature of the prism surface, the sample should be placed in the measuring cell for a period of time before measuring.
4. Zero adjustment
If you find that the measurement accuracy of the low-range range is reduced, perform zero adjustment.
4.1 Prepare distilled water or tap water.
4.2 Clean the prism surface.
4.3 Drop about 0.3ml of clean water onto the surface of the prism, about 2/3 of the depth of the sampling pool.
4.4 Select "Zero CAL" in the menu, press the confirm key to enter the calibration, wait for the reading to appear, press the confirm key again; wait.
4.5 If "CAL OK" is displayed, it indicates that the zero adjustment is successful;
4.6 If it shows "CAL ERR", it means the calibration has failed. The possible reason is to use improper zero level water for calibration.
The zero adjustment of the instrument is completed, and the display shows 0.0%; wipe the water on the prism with lens cleaning paper. At this time, the sample can be measured.
5. Error message
5.1 During zero adjustment, there is no clear water or other solution instead of clear water in the measuring cell. "CAL ERR" is displayed during calibration.
5.2 "Low Batter" appears when powering on, indicating that the battery voltage is not enough, and the battery needs to be replaced.
5.3 If the measured value of the sample is higher than 53%, it cannot be measured.
5.4 The surface temperature of the prism is lower than 10℃ or higher than 40℃.
6. Daily maintenance:
6. 1 After the measurement, wipe the sample on the surface of the prism with lens cleaning paper, and then drop a few drops of water onto the surface of the prism. Clean the surface of the prism and the sample stage with lens cleaning paper.
Be careful not to use too much force or use paper and cloth that are not soft enough to avoid scratching the surface of the prism.
6.2 The instrument will automatically enter the standby state within the set timed shutdown time, and the display will turn off, which is normal.
6.3 Avoid direct sunlight on the prism surface during measurement. Otherwise, the measurement result will be inaccurate.
6.4 If the battery runs out of power, it should be replaced as soon as possible to avoid leakage.
6.5 Please pay attention to waterproof when using the instrument.
6.6 Avoid falling or being damaged.
6. 7 Avoid using organic solvents to wipe the machine
Logistics information
Our products are located in Hong Kong, China, and the logistics speed depends on your specific location. According to our experience, it usually takes about 15-20 days of transportation time
CONTACT US
RETURNS POLICY
Lorem ipsum dolor sit amet, consectetur adipiscing elit. Morbi ut blandit risus. Donec mollis nec tellus et rutrum. Orci varius natoque penatibus et magnis dis parturient montes, nascetur ridiculus mus. Ut consequat quam a purus faucibus scelerisque. Mauris ac dui ante. Pellentesque congue porttitor tempus. Donec sodales dapibus urna sed dictum. Duis congue posuere libero, a aliquam est porta quis.
Donec ullamcorper magna enim, vitae fermentum turpis elementum quis. Interdum et malesuada fames ac ante ipsum primis in faucibus.
Curabitur vel sem mi. Proin in lobortis ipsum. Aliquam rutrum tempor ex ac rutrum. Maecenas nunc nulla, placerat at eleifend in, viverra etos sem. Nam sagittis lacus metus, dignissim blandit magna euismod eget. Suspendisse a nisl lacus. Phasellus eget augue tincidunt, sollicitudin lectus sed, convallis desto. Pellentesque vitae dui lacinia, venenatis erat sit amet, fringilla felis. Nullam maximus nisi nec mi facilisis.
SHIPPING
Lorem ipsum dolor sit amet, consectetur adipiscing elit. Morbi ut blandit risus. Donec mollis nec tellus et rutrum. Orci varius natoque penatibus et magnis dis parturient montes, nascetur ridiculus mus. Ut consequat quam a purus faucibus scelerisque. Mauris ac dui ante. Pellentesque congue porttitor tempus. Donec sodales dapibus urna sed dictum. Duis congue posuere libero, a aliquam est porta quis.
Donec ullamcorper magna enim, vitae fermentum turpis elementum quis. Interdum et malesuada fames ac ante ipsum primis in faucibus.
Curabitur vel sem mi. Proin in lobortis ipsum. Aliquam rutrum tempor ex ac rutrum. Maecenas nunc nulla, placerat at eleifend in, viverra etos sem. Nam sagittis lacus metus, dignissim blandit magna euismod eget. Suspendisse a nisl lacus. Phasellus eget augue tincidunt, sollicitudin lectus sed, convallis desto. Pellentesque vitae dui lacinia, venenatis erat sit amet, fringilla felis. Nullam maximus nisi nec mi facilisis.

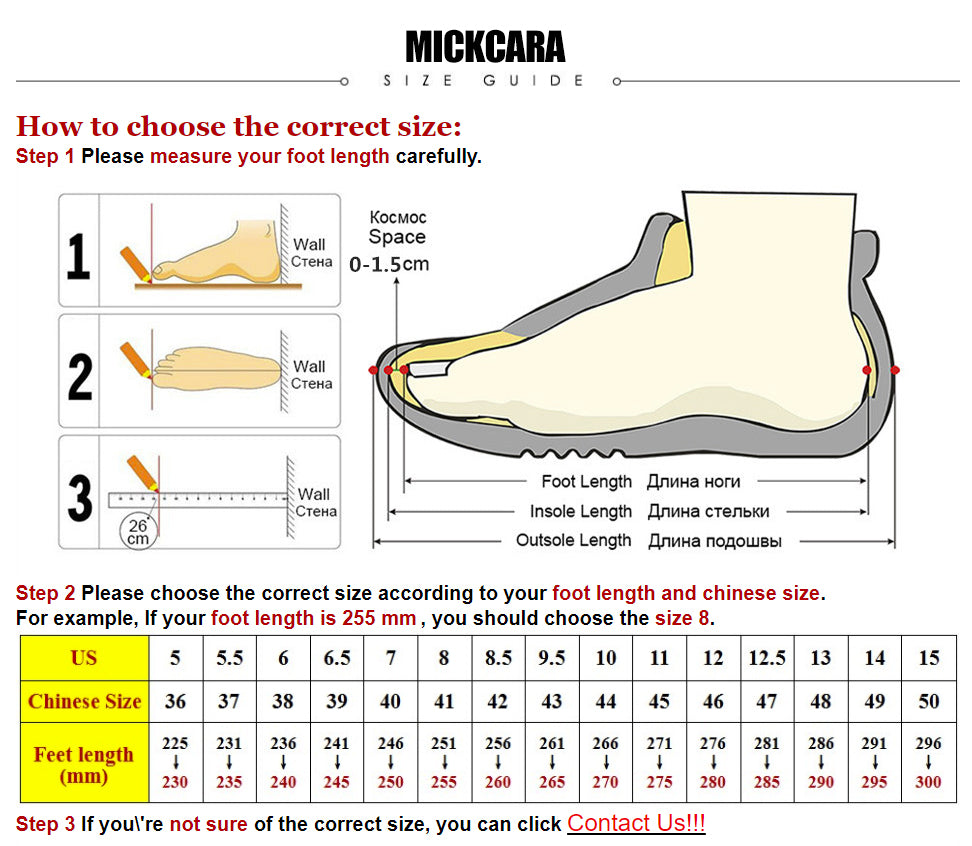
How to choose the correct size:
Step 1 Please measure your foot length carefully.

Step 2 Please choose the correct size according to your foot length and chinese size.
For example, If your foot length is 255 mm , you should choose the size 8.