Receiver Collar Features:
Prevent “Run-through”: When the dog gets closer to the boundary barrier, the receiver will send a warning beep 10 times and then start shocking through the metal probes. As the dog gets closer to the border, the shock intensity will increase until it returns to the safe zone.
A.Metal Probes
1. Make sure the two metal probes contacts are touching your pet's skin. It could be necessary to trim the hair so that contact is consistent.
2. Short hair/fur can use the short probes and long hair/fur can use the longer probes.
3. Twist the probes with your fingers to tighten it. Be careful not to make it too tight.
4. Check the tightness of the probes to make sure that it won't fall off from the receiver.
B. Collar
1.To avoid any unnecessary accidents, take the collar off the dog when you bring it in the house.
2. Place the receiver collar on your dog's neck. Check the tightness of the collar strap and adjust it to ensure the metal probes are in contact with your pet’s neck and not too tight to affect breathing. You should be able to fit your finger between the end of a probe and your pet’s neck.
3. Make sure the receiver collar operates correcting before placing it on your dog.
4. When you place the receiver collar on your dog, be sure to remove any metallic collar strap from you dog as it may interfere with normal operation.
5. Once you are certain of the fitting, you can trim the extra collar strap.
1.Receiver collar ON/OFF function
1.1Press the power button once , Turn on and the green light flashes quickly (every second), will beep once, and become beeping mode, but the metal probes (4) will not shock.
1.2Press the power button again , Green light flashes slowly (every 2 seconds), and become low shock mode. When in correction (close to the boundary wire), it will beep 10 times and then start low level shock.
1.3Press the power button again , Red light flashes slowly (every 2 seconds), and become high shock mode. When in correction (close to the boundary wire), it will beep 10 times and then start high level shock.
1.4Press the power button again ,Turn off.
2.Working Mode LED Indicator
Beeping mode (Green LED flash flashes every second), go into standby mode when there’s no motion for 60 seconds (LED off in standby mode, when there’s motion again, it will wake up and become active), low shock mode (Green LED flashes every 2 seconds), high shock mode (Red LED flashes every 2 seconds), charging mode (Red LED flashes every half a second), full charge (Solid Green LED).
3.Charging
Use the USB charging cable that came with the system to charge. Insert the USB cable into the fence transmitter USB port, (if you need to use another power adapter, please make sure the output voltage is 5.0V and output current greater than 500mA). Open the charging port flap of the receiver, insert the 5.5mm end into the receiver’s port, the indicator light will start flashing red to show that it is charging. The charging time is about 2.5 hours, and it will beep once with a solid green light when it’s fully charged. Unplug the charging cable will automatically turn on the receiver in vibration mode.
Newly purchased receiver or receiver that hasn’t been used for a long time, please increase the charging time, but no longer than 4 hours.
4. Metal Probes Placement
Use different sized probes on different size dogs.
Placing the collar on your dog
Important: Do not leave the collar on your dog for more than 12 consecutive hours a day. Wearing it too long or too tight may cause skin damage or injury. Examine your dog's collar contact area carefully for signs of redness, rash or sore regularly.
Logistics information
Our products are located in Hong Kong, China, and the logistics speed depends on your specific location. According to our experience, it usually takes about 15-20 days of transportation time
CONTACT US
RETURNS POLICY
Lorem ipsum dolor sit amet, consectetur adipiscing elit. Morbi ut blandit risus. Donec mollis nec tellus et rutrum. Orci varius natoque penatibus et magnis dis parturient montes, nascetur ridiculus mus. Ut consequat quam a purus faucibus scelerisque. Mauris ac dui ante. Pellentesque congue porttitor tempus. Donec sodales dapibus urna sed dictum. Duis congue posuere libero, a aliquam est porta quis.
Donec ullamcorper magna enim, vitae fermentum turpis elementum quis. Interdum et malesuada fames ac ante ipsum primis in faucibus.
Curabitur vel sem mi. Proin in lobortis ipsum. Aliquam rutrum tempor ex ac rutrum. Maecenas nunc nulla, placerat at eleifend in, viverra etos sem. Nam sagittis lacus metus, dignissim blandit magna euismod eget. Suspendisse a nisl lacus. Phasellus eget augue tincidunt, sollicitudin lectus sed, convallis desto. Pellentesque vitae dui lacinia, venenatis erat sit amet, fringilla felis. Nullam maximus nisi nec mi facilisis.
SHIPPING
Lorem ipsum dolor sit amet, consectetur adipiscing elit. Morbi ut blandit risus. Donec mollis nec tellus et rutrum. Orci varius natoque penatibus et magnis dis parturient montes, nascetur ridiculus mus. Ut consequat quam a purus faucibus scelerisque. Mauris ac dui ante. Pellentesque congue porttitor tempus. Donec sodales dapibus urna sed dictum. Duis congue posuere libero, a aliquam est porta quis.
Donec ullamcorper magna enim, vitae fermentum turpis elementum quis. Interdum et malesuada fames ac ante ipsum primis in faucibus.
Curabitur vel sem mi. Proin in lobortis ipsum. Aliquam rutrum tempor ex ac rutrum. Maecenas nunc nulla, placerat at eleifend in, viverra etos sem. Nam sagittis lacus metus, dignissim blandit magna euismod eget. Suspendisse a nisl lacus. Phasellus eget augue tincidunt, sollicitudin lectus sed, convallis desto. Pellentesque vitae dui lacinia, venenatis erat sit amet, fringilla felis. Nullam maximus nisi nec mi facilisis.

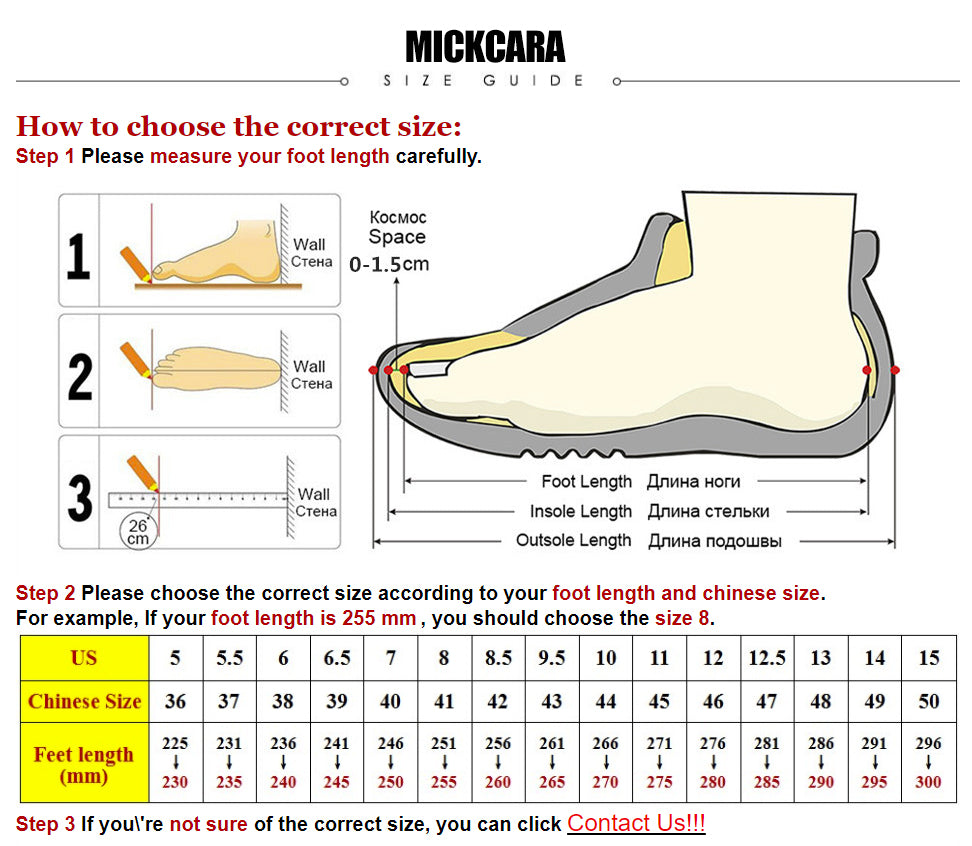
How to choose the correct size:
Step 1 Please measure your foot length carefully.

Step 2 Please choose the correct size according to your foot length and chinese size.
For example, If your foot length is 255 mm , you should choose the size 8.