10A 12V 24V LCD Display Digital Temperature Controller Regulator Thermocouple Thermostat Sensor With NTC-10K B3950 Probe Cable
1.Description:
It is a digital temperature controller module.LCD display, very clear, easy to use, powerful.It can be widely used at Smart home,Industrial control,Automatic irrigation,Indoor ventilation.Protection equipment.
2.Features:
1>.LCD display;
2>.Power-down memory function;
3>.Emergency stop function;
4>.Real-time display temperature;
5>.Automatically save parameters;
6>.Support UART Set;
7>.Support Heating and Cooling work mode;
8>.High temperature buzzer alarm;
9>.Work status indicator;
10>.Independent of parameters;
11>.With case, beautiful and practical;
12>.High precision;
13>.Multiple parameters are displayed simultaneously.
3.Parameters:
1>.Product Name:Digital Temperature Controller
2>.Product Number:XY-WT01
3>.Working Voltage:DC 6V-30V
4>.Control Load Current:10A(Max)
5>.LCD refresh rate:0.5 second
6>.Temperature Sensor:NTC-10K B3950
7>.Test temperature: -50~110℃
8>.Control precision:0.1℃
9>.Sensor length: 0.5 meter
10>.Sensor probe specifications:4*30mm Stainless steel
11>.Physical dimension:79*44*26mm
12>.Operating Humidity:5%~95%RH
4.Work Mode:
1>.’ H ’: Heating mode.
Relay will turn ON and the heating device starts to work when Current Temperature Value is less than Setting Temperature Value - Return Temperature Value.
Relay will turn OFF and the heating device stops to work when Current Temperature Value is more than Setting Temperature Value.
2>.’ C ’: Cooling mode.
Relay will turn ON and the cooling device starts to work when Current Temperature Value is more than Setting Temperature Value + Return Temperature Value.
Relay will turn OFF and the cooling device stops to work when Current Temperature Value is less than Setting Temperature Value.
3>.’ OPH ’: ON/OFF delayed start.
The system starts timing 'T' when a normal heating or cooling operation is completed.The system will begin the next round of heating or cooling only after 'T'>'OPH'.
4>.’ OFE ’: Temperature correction function(-10.0~10.0℃).
If the module works for a long time, there may be deviations. Corrected by this function.
Actual Temperature Value = Current Temperature Value + Calibration Value.
5>.’ ALA ’: Set high temperature alarm.
Module will turn on the sound and light alarm and relay will OFF at the same time when Current Temperature Value is more than Set Alarm Temperature Value.Any button to stop the sound and light alarm.
5.Additional Features:
1>. Set or read data by UART.
The parameters such as start temperature, stop temperature, temperature correction, etc. can be set through the UART.
2>.Temperature real-time reporting.
The module transmits the detected temperature to the terminal through the UART at intervals of 1 s to facilitate data acquisition if the temperature reporting function is turned on.
3>.Relay enable (default on).
If the relay enable is turned off, the relay remains off.
That is, the output state will never change, no matter what the measured temperature is.
4>.Reset.
Press button ‘STOP’ and ‘SET’ for more than 3second at the same time to restore the factory settings.
6.Set Parameter :
Long press:keep press button for more than 3second.
1>.Set Working mode/Setting temperature/Return Temperature Value
1.1>.Short press button 'SET' and enter the quick setting interface;
1.2>.Switch the parameters that need to be set for Working mode/Setting temperature/Return Temperature Value by short press button 'SET'.
1.3>.Modify the parameter value by button 'UP' or 'DOWN' after select parameter.Support short press/long press;
1.4>.Exit the quick setting interface and save the parameters by long press button 'SET' for 3second or continue 6S without any button operation.
NOTE:The Return Temperature Value display in the first line where the Current Temperature Value display position.
The Setting Temperature Value display in the second line after ‘H’ or ‘C’.
2>.Set OPH/OFE/ALA
2.1>.Long press button 'SET' and enter the parameter setting interface.
2.2>.Switch the parameters that need to be set for OPH/OFE/ALA by short press button 'SET'.
2.3>.Modify the parameter value by button 'UP' or 'DOWN' after select parameter.Support short press/long press;
2.4>.Exit the parameter setting interface and save the parameters by long press button 'SET' for 3second or continue 6S without any button operation.
2.5>How to turn on the high temperature alarm ‘ALA’ (default off).Select ‘ALA’ interface,short press button ‘STOP’ to ON or OFF ‘ALA’.Set high temperature value by button ‘UP’ or ‘DOWN’ if turn ON ‘ALA’.If the high temperature alarm function is turned OFF, ‘ALA’ displays ‘----’ as a reminder.LCD will display ‘W’ if turn ON ‘ALA’.
2.6>.How to enable delayed start ‘ OPH ’(default off).Select ‘ OPH ’ interface,short press button ‘STOP’ to ON or OFF ‘ OPH ’.Set delay time value by button ‘UP’ or ‘DOWN’ if turn ON ‘ OPH ’.If the delayed star function is turned OFF, ‘ OPH ’ displays ‘----’ as a reminder.LCD will display ‘h’ in last line and last bit if turn ON delayed start.
7.Use steps:
1>.Connect NTC sensor to Digital Temperature Controller;
2>.Connect voltage to module;
3>.Set parameters;
4>.Remove input voltage;
5>.Connect to load;
6>.Connect voltage to module;
8.UART communication and parameter settings
The system supports UART data upload and parameter setting functions (TTL level);
UART: 9600, 8, 1
9.Application:
1>.Smart home
2>.Industrial control
3>.Automatic irrigation
4>.Indoor ventilation
5>.Self-made thermostatic control box
6>.Equipment cabinet
7>.Air conditioning system
8>.Temperature control protection
9>.Refrigerator
10>.Freezer
11>.Water heater
12>.Hosts
13>.Hatch control
10.Note:
It is a relay output mode and cannot be used as a power module. It cannot output voltage. The load needs to be connected to a separate power supply.
Logistics information
Our products are located in Hong Kong, China, and the logistics speed depends on your specific location. According to our experience, it usually takes about 15-20 days of transportation time
CONTACT US
RETURNS POLICY
Lorem ipsum dolor sit amet, consectetur adipiscing elit. Morbi ut blandit risus. Donec mollis nec tellus et rutrum. Orci varius natoque penatibus et magnis dis parturient montes, nascetur ridiculus mus. Ut consequat quam a purus faucibus scelerisque. Mauris ac dui ante. Pellentesque congue porttitor tempus. Donec sodales dapibus urna sed dictum. Duis congue posuere libero, a aliquam est porta quis.
Donec ullamcorper magna enim, vitae fermentum turpis elementum quis. Interdum et malesuada fames ac ante ipsum primis in faucibus.
Curabitur vel sem mi. Proin in lobortis ipsum. Aliquam rutrum tempor ex ac rutrum. Maecenas nunc nulla, placerat at eleifend in, viverra etos sem. Nam sagittis lacus metus, dignissim blandit magna euismod eget. Suspendisse a nisl lacus. Phasellus eget augue tincidunt, sollicitudin lectus sed, convallis desto. Pellentesque vitae dui lacinia, venenatis erat sit amet, fringilla felis. Nullam maximus nisi nec mi facilisis.
SHIPPING
Lorem ipsum dolor sit amet, consectetur adipiscing elit. Morbi ut blandit risus. Donec mollis nec tellus et rutrum. Orci varius natoque penatibus et magnis dis parturient montes, nascetur ridiculus mus. Ut consequat quam a purus faucibus scelerisque. Mauris ac dui ante. Pellentesque congue porttitor tempus. Donec sodales dapibus urna sed dictum. Duis congue posuere libero, a aliquam est porta quis.
Donec ullamcorper magna enim, vitae fermentum turpis elementum quis. Interdum et malesuada fames ac ante ipsum primis in faucibus.
Curabitur vel sem mi. Proin in lobortis ipsum. Aliquam rutrum tempor ex ac rutrum. Maecenas nunc nulla, placerat at eleifend in, viverra etos sem. Nam sagittis lacus metus, dignissim blandit magna euismod eget. Suspendisse a nisl lacus. Phasellus eget augue tincidunt, sollicitudin lectus sed, convallis desto. Pellentesque vitae dui lacinia, venenatis erat sit amet, fringilla felis. Nullam maximus nisi nec mi facilisis.

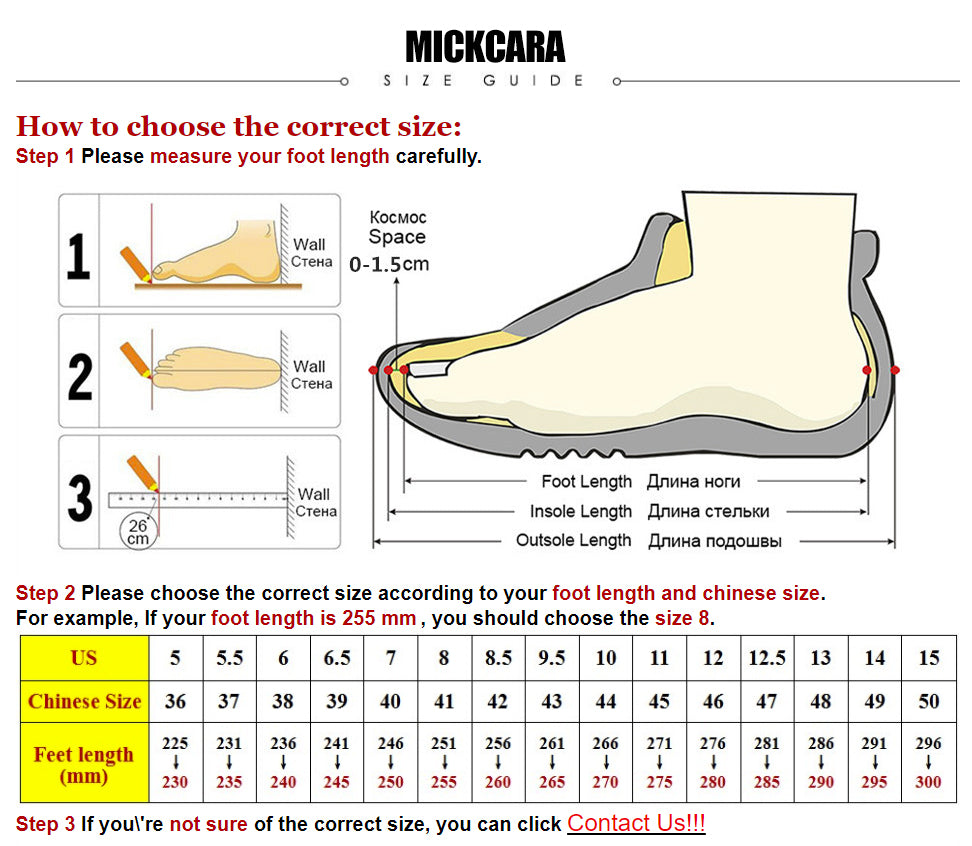
How to choose the correct size:
Step 1 Please measure your foot length carefully.

Step 2 Please choose the correct size according to your foot length and chinese size.
For example, If your foot length is 255 mm , you should choose the size 8.