Digital 4-20mA 0-10V Voltage Signal Generator 0-20mA Current Transmitter Professional Electronic Measuring Instruments
Description:
MODEL:QH-VISG2-ED(Withbattery) / QH-VISG2-EN(No battery)
Voltage And Current Signal Generator-User manual V202008
1.Technical Indicators
1.1 Three power supply modes ,using the mobile phone charger or external 24V can charge/work;
1.1.1 External wiring terminal power supply DC15-30V 1W(without charging)/4W(charging);
1.1.2 External MicroUSB-5V current 0.2a (no charge)/0.8A(charge);
1.1.3 (Optional) The built-in 3.7V lithium battery(1000mah), the maximum charging current is 0.6A,Generally, it takes more than 4 hours to fully charge. It can be used for 1-5 hours;
1.2 The voltage output is adjustable ± 10V,Error<0.05V after calibration, and the driving current<20mA
1.3 The current output is adjustable 0-22ma,Error<0.05mA after calibration, and the sampling resistance is <500Ω;
1.4working environment: 0-40℃, relative humidity < 80%;
1.5Size (cm):Shell=100x60x20,The plugprotruding 9cm,Theknobprotruding15cm
2.Wiring diagram
2.1 Voltage signal output:5-AVO 6-GND
2.2 Common active mode of current output:Our output 4-AIO6-GNDcorresponds to PLC I + I -!
2.3 Current passive mode:ThePIN3-AI+ is externally connected to 24V+, and then output from 4-AIO to control the external 24V current.Our meter is equivalent to an adjustable resistance;Therefore, it is called passive mode.
3.Usage
3.1 Operation panel and operation instructions
3.2 Switching - Adjust the display V or I, press the "MODE" key to switch and adjust the display V or I MODE
The indicator light shows what state it is in and what mode the system operation is in;
The original output will continue to output After switching, but not in the adjustment status;
Turn on the battery switch to check the battery status and quantity
3.2.1 Batterystatus indicator:
Batteryindicator
Green
Yellow
Red
Twinkle
Green not Twinkle(External power)
capacity
≥80%
≥40%
>0
Charging。。。
Full
3.2.2Hold the "MODE" key for 1 second and the digital tube flashes for 5 seconds to display the battery voltage;
3.3 Digital adjustment and parameter setting:
(Forewarned:Push Down The Knob Is “OK<Confirm>”,Clockwise Rotation The Knob One Pulse Is” + <Add>”, Anticlockwise Rotation The Knob One Pulse Is” - <Minus>”)
3.3.1 Short Press “OK” To Save The Output Value,Digital Tube Display "..." After loosening, Saved Successfully, The Output Value Is This Saved Value After The Next Boot; When We Debug The Device, We Need To Adjust The Output Value Randomly, As Long As The Knob Is Not Pressed, It Will Still Be The Saved Value After Rebooting;
3.3.2 Hold The “OK” For 2 Seconds To Enter The Setting State.,Display”F001”(Parameter Number 001);
3.3.3 Turn the knob to change the parameter number, You need to enter a password when enter F002 or F100:
3.3.3.1 F001->F002enter a password“+ - - +(Turn the knob)”,Then press the knob to enter;
3.3.3.2 F001->F100enter a password“+ - + -(Turn the knob)”,Then press the knob to enter;
3.3.4 Press "Ok" to enter the setting of corresponding parameter value, and turn the knob to modify parameters;
3.3.5 Press "Ok" to save the parameter, exit the parameter setting, and display the next parameter number (after setting the F001 value without entering the password, the normal operation screen will enter);
3.3.6 Rotate the knob directly to the last parameter number, press the "OK" key, and the setting is completed;
3.3.7 If no operation on the parameter setting screen exceeds 10s, it will exit the setting state;
1.4 Voltage setting parameters. please read section 3.4 before operating, especially to enter a password:
3.5 Currentsetting parameters. please read section 3.4 before operating, especially to enter a password:
4. current problem detection: the possibility of the current not output is very small,you can measured the voltage of 4-AIO 6-GND with a multimeter, if it is >20V, than current file of your multimeter is broken or gear is wrong, because there are voltage must be current, try change a multimeter, multimeter current file inside a fuse is easy to burn;
5.PleaseReadThisManualCarefullyBeforeWiring,TurnOffThePowerAndThenConnect;
Logistics information
Our products are located in Hong Kong, China, and the logistics speed depends on your specific location. According to our experience, it usually takes about 15-20 days of transportation time
CONTACT US
RETURNS POLICY
Lorem ipsum dolor sit amet, consectetur adipiscing elit. Morbi ut blandit risus. Donec mollis nec tellus et rutrum. Orci varius natoque penatibus et magnis dis parturient montes, nascetur ridiculus mus. Ut consequat quam a purus faucibus scelerisque. Mauris ac dui ante. Pellentesque congue porttitor tempus. Donec sodales dapibus urna sed dictum. Duis congue posuere libero, a aliquam est porta quis.
Donec ullamcorper magna enim, vitae fermentum turpis elementum quis. Interdum et malesuada fames ac ante ipsum primis in faucibus.
Curabitur vel sem mi. Proin in lobortis ipsum. Aliquam rutrum tempor ex ac rutrum. Maecenas nunc nulla, placerat at eleifend in, viverra etos sem. Nam sagittis lacus metus, dignissim blandit magna euismod eget. Suspendisse a nisl lacus. Phasellus eget augue tincidunt, sollicitudin lectus sed, convallis desto. Pellentesque vitae dui lacinia, venenatis erat sit amet, fringilla felis. Nullam maximus nisi nec mi facilisis.
SHIPPING
Lorem ipsum dolor sit amet, consectetur adipiscing elit. Morbi ut blandit risus. Donec mollis nec tellus et rutrum. Orci varius natoque penatibus et magnis dis parturient montes, nascetur ridiculus mus. Ut consequat quam a purus faucibus scelerisque. Mauris ac dui ante. Pellentesque congue porttitor tempus. Donec sodales dapibus urna sed dictum. Duis congue posuere libero, a aliquam est porta quis.
Donec ullamcorper magna enim, vitae fermentum turpis elementum quis. Interdum et malesuada fames ac ante ipsum primis in faucibus.
Curabitur vel sem mi. Proin in lobortis ipsum. Aliquam rutrum tempor ex ac rutrum. Maecenas nunc nulla, placerat at eleifend in, viverra etos sem. Nam sagittis lacus metus, dignissim blandit magna euismod eget. Suspendisse a nisl lacus. Phasellus eget augue tincidunt, sollicitudin lectus sed, convallis desto. Pellentesque vitae dui lacinia, venenatis erat sit amet, fringilla felis. Nullam maximus nisi nec mi facilisis.

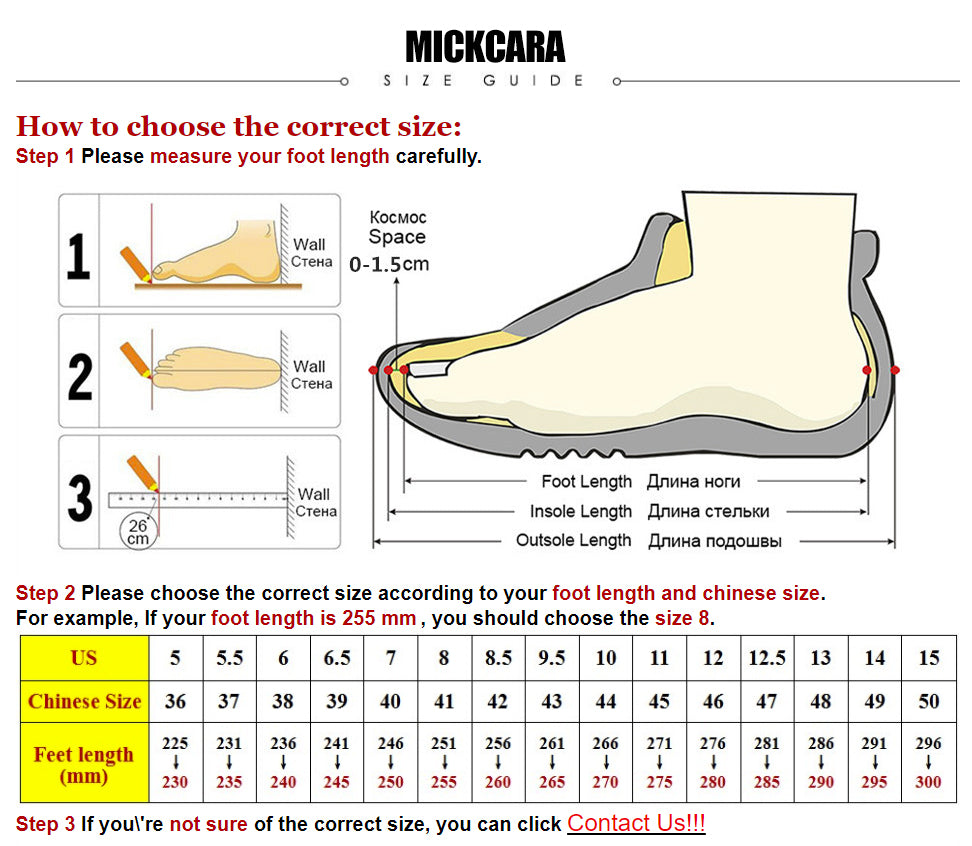
How to choose the correct size:
Step 1 Please measure your foot length carefully.

Step 2 Please choose the correct size according to your foot length and chinese size.
For example, If your foot length is 255 mm , you should choose the size 8.